Entrega a domicilio en todo el mundo
Is your favorite water bottle starting to smell funky? Drinking from a dirty bottle ruins your hydration goals. Discover the ultimate routine for pristine, odor-free reusable bottles and infusers.
To clean and maintain reusable bottles and infusers, dismantle all parts daily and wash with warm, soapy water. Use a bottle brush for the interior and a tiny wire brush for filters. Weekly deep cleaning with vinegar or baking soda prevents mold, stubborn odors, and bacterial buildup.
Ignoring your bottle's hygiene isn't just gross; it actively harms your health and ruins your favorite teas. Let's explore the exact, step-by-step methods you need to know to keep your drinkware safe, sparkling, and ready for your next adventure.
Tired of old tea flavors ruining your fresh brew? Leftover tannins cling to mesh filters, making your tea taste bitter. Here is the ultimate cleaning method for perfect flavor.
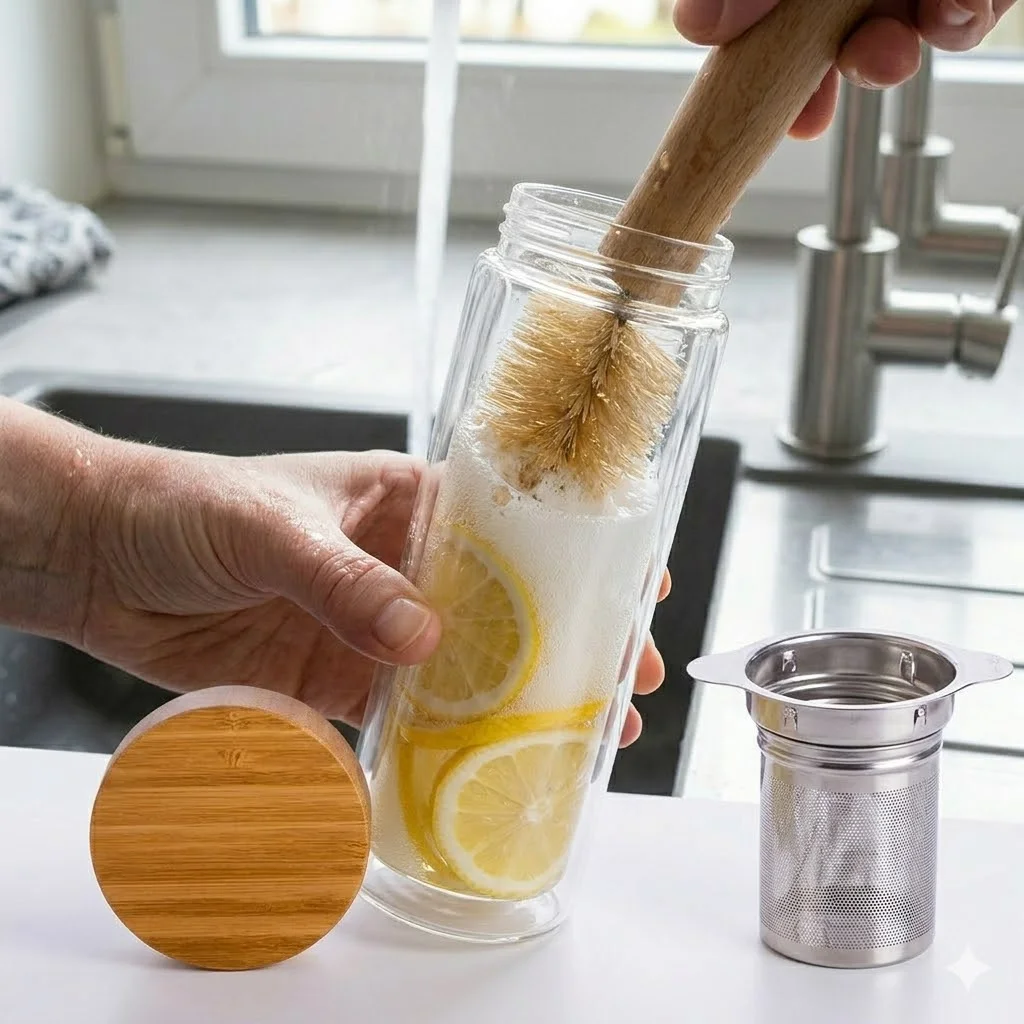
The best way to clean a tea infuser bottle is to remove the metal basket, scrub the mesh with a small bristled brush and baking soda paste, and soak it in hot water. Wash the main bottle with warm soapy water, ensuring no tea leaves remain trapped.
Before using a new water bottle for the first time, it is highly recommended to perform a thorough cleaning, whether it is a stainless steel flask, glass bottle, or ceramic mug. During the manufacturing process, substances such as release agents and even certain chemicals may be used on the machinery. In addition, dust and particles naturally accumulate during packaging. The production environment of drinkware is generally not a sterile, medical-grade facility. Although manufacturers rinse the products with water after production, some invisible bacteria or factory residue may still remain. Therefore, before using a new water bottle, please make sure to clean it thoroughly. It is recommended to rinse it with boiling water for sterilization and use a mild detergent for additional cleaning. In daily use, the cup should also be cleaned regularly to maintain hygiene and freshness.
| Componente | Cleaning Method | Frequency |
| Bottle Body | Warm soapy water and bottle brush | Daily |
| Mesh Infuser | Baking soda paste and micro-brush | After each use |
| Lid/Seals | Remove silicone rings, scrub with soap | Weekly deep clean |
Hate hand-washing dishes but fear shattering your favorite glass bottle? High dishwasher heat can destroy fragile drinkware. Find out how to safely machine-wash your glass infusers without damage.
Most high-quality borosilicate glass infuser bottles can go into the dishwasher safely on the top rack. However, always hand-wash bamboo lids, silicone seals, and painted exteriors, as high heat and harsh detergents can warp natural materials and degrade watertight seals over time.

High-quality glass bottles, like those found at Vajilla ecológica, are typically crafted from borosilicate glass. This specific material boasts a remarkably high resistance to thermal shock, meaning it won't crack under sudden temperature changes. While the glass body itself can easily withstand the scalding temperatures of a modern dishwasher cycle, the ancillary components simply cannot. Placing a bamboo lid in the dishwasher will cause the wood to swell, crack, and eventually rot as water forces its way into the natural grain. Similarly, the intense heat can warp the internal silicone gaskets, leading to a bottle that permanently leaks.
"To prolong the life of any reusable container, treat the dishwasher as an occasional convenience for the glass body, but strictly hand-wash the lids and seals to preserve structural integrity." — Dr. Sarah Jenkins, Materials Safety Specialist.
| Material Type | Dishwasher Safe? | Recommended Care Instructions |
| Borosilicate Glass | Yes (Top Rack) | Place securely on prongs to avoid clinking. |
| Bamboo Lids | No | Hand-wash quickly, dry immediately. |
| Stainless Filters | Sí | Top rack, away from the bottom heating element. |
| Silicone Seals | No | Hand-wash in mild soapy water. |
Does your water taste metallic or stale? Bacteria biofilms build up silently inside dark metal flasks, compromising your health. Discover the deep-cleaning schedule your stainless steel bottle desperately needs.
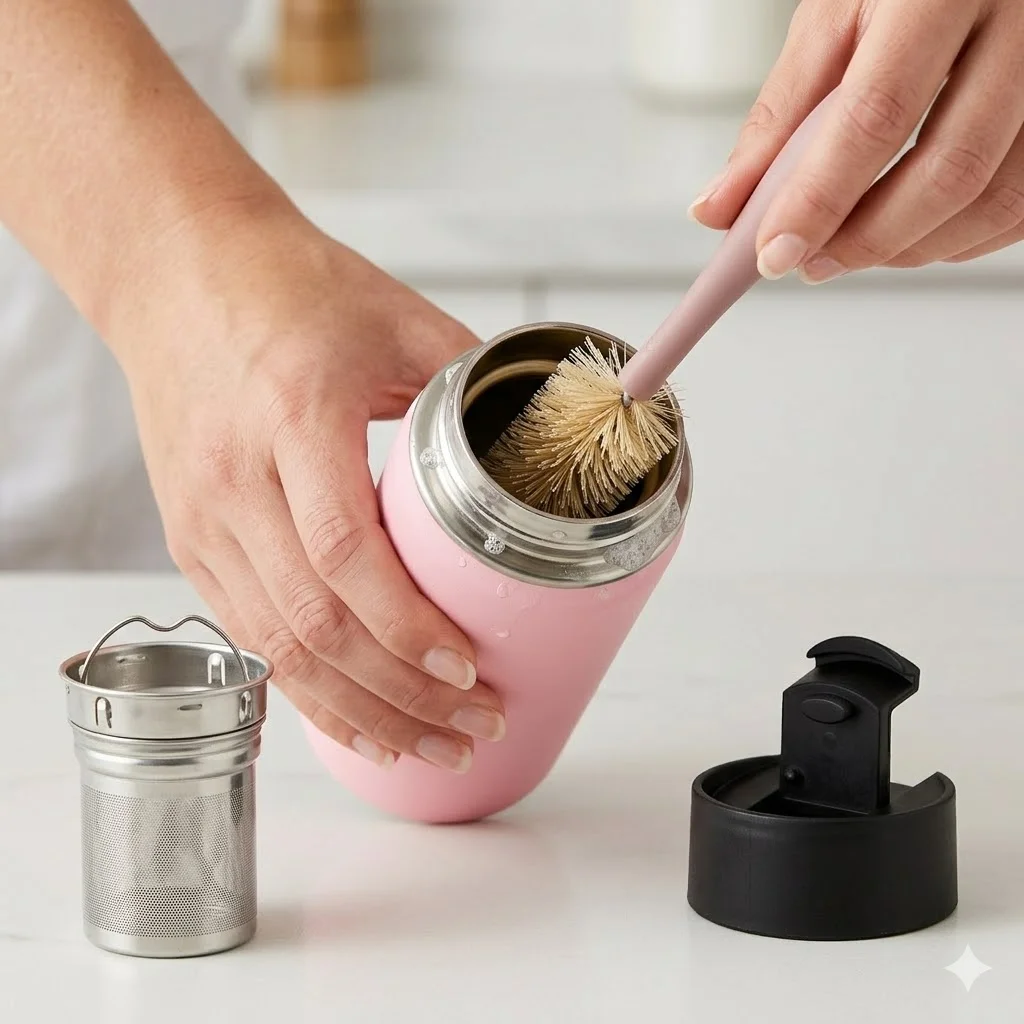
You should deep-clean a stainless steel bottle at least once a week if used daily for water, and immediately after using it for sugary drinks, coffee, or tea. Regular daily washing prevents biofilm buildup, but weekly deep cleaning sanitizes the metal and eliminates lingering tastes.
Stainless steel flasks are incredibly durable and excellent at maintaining temperature, but their opaque nature hides a dirty secret: biofilms. These are slimy, persistent colonies of bacteria that thrive in moist, dark environments. Even if you only drink filtered water, the bacteria from your mouth transfer to the bottle's rim and slowly migrate to the interior. A simple rinse won't cut it. Deep cleaning requires dismantling the bottle entirely. This means physically removing the O-rings from the lid, soaking them separately in a sanitizing solution, and scrubbing the intricate threads of the cap where grime loves to hide. Ignoring this process can lead to gastrointestinal distress and a perpetually foul-tasting beverage.
| Beverage Type | Daily Action | Deep Clean Frequency |
| Purified Water | Hot water & soap wash | Once a week |
| Tea / Coffee | Scrub with brush & soap | Twice a week |
| Juice / Smoothies | Immediate hot soapy scrub | After every single use |
Struggling to reach the bottom of your sleek, narrow-mouthed bottle? Standard sponges simply won't fit, leaving the base grimy. Uncover the specialized tools designed to conquer narrow bottle necks.
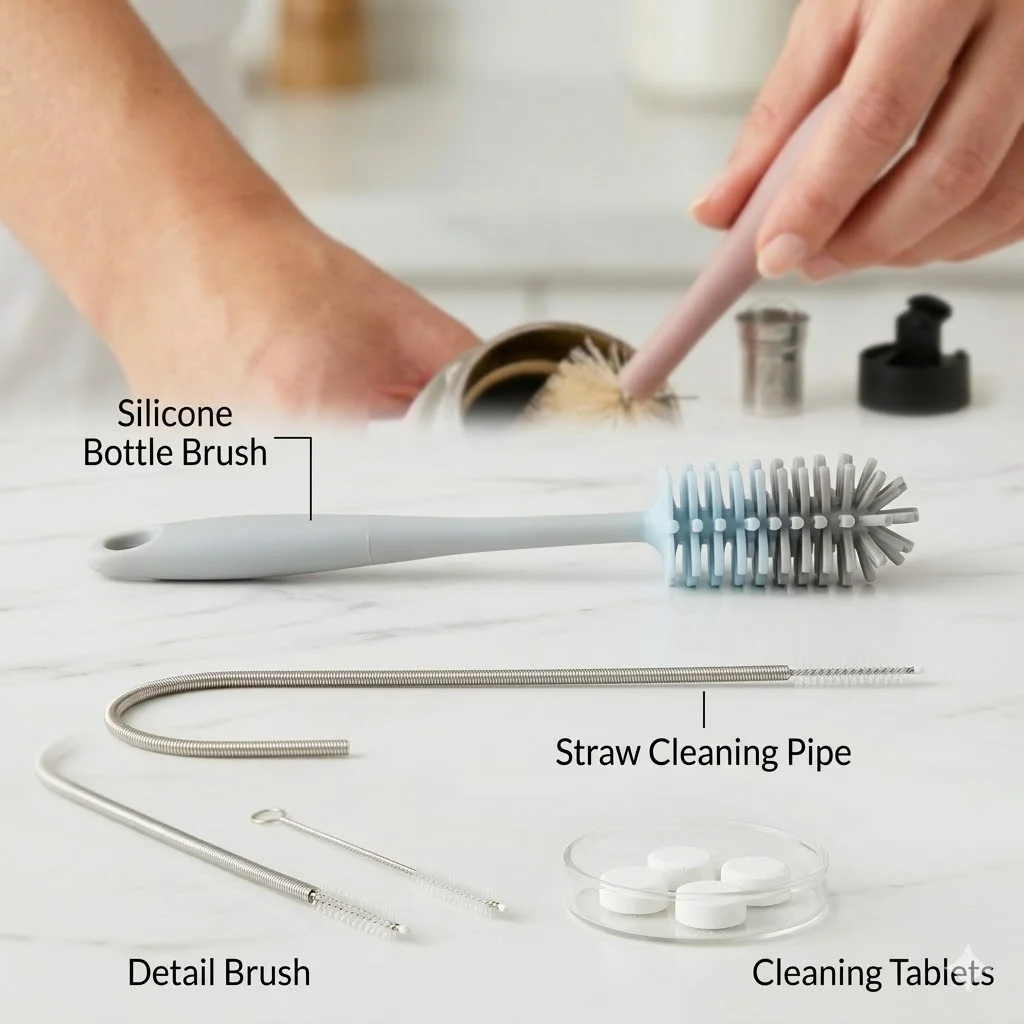
The best cleaning tools for narrow bottle openings are long-handled silicone bottle brushes, which won't scratch interiors, and flexible wire straw cleaners for tight spouts. Additionally, bottle cleaning tablets offer a scrub-free solution by effervescing away grime at the very bottom.
Using the wrong tool to clean your drinkware can be just as detrimental as not cleaning it at all. Shoving a standard kitchen sponge down a narrow neck with the handle of a wooden spoon is an exercise in frustration; it often fails to clean the bottom edges and can trap torn sponge fragments inside the bottle. Instead, invest in a dedicated set of bottle-cleaning tools. Silicone brushes are highly recommended because they naturally repel bacteria, unlike traditional bristle or sponge brushes that can harbor odors and germs if not dried perfectly. Furthermore, the threads around narrow openings require special attention; a detailing brush (which often resembles a small toothbrush) is perfect for dislodging trapped residue from the mouthpiece and lid grooves.
| Cleaning Tool | Best Used For | Primary Advantage |
| Silicone Bottle Brush | Narrow bottle bodies | Doesn't harbor bacteria, scratch-free. |
| Straw Cleaning Pipe | Spouts and reusable straws | Reaches microscopic crevices easily. |
| Detail Brush | Lid threads, O-ring grooves | Removes hidden grime and mold buildup. |
| Cleaning Tablets | Hard-to-reach bottle bases | Bubbles away deep stains with zero effort. |
Worried about ingesting toxic bleach residue from your water bottle? Chemical cleaners are harsh and dangerous to consume. Learn how natural pantry staples can safely and effectively sanitize drinkware.
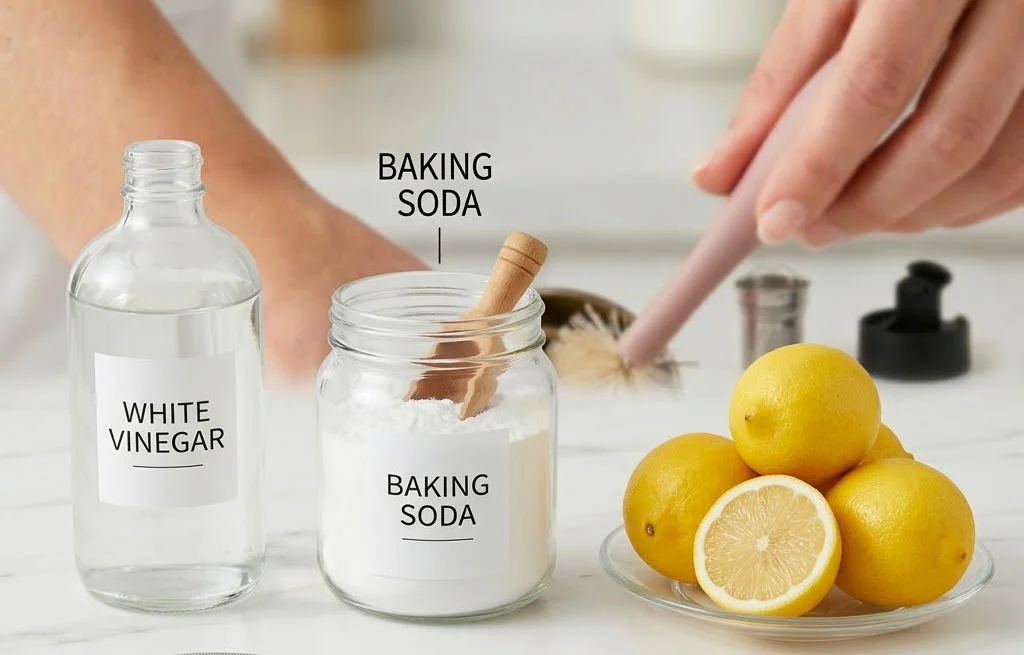
Yes, natural cleaning methods are highly effective. White vinegar is an excellent antibacterial agent that dissolves hard water stains, while baking soda acts as a mild abrasive to scrub away residue and absorb stubborn odors. Lemon juice naturally sanitizes and leaves a fresh scent.
Natural cleaners are not just old wives' tales; they rely on fundamental chemistry to break down grime without leaving dangerous chemical residues behind. White vinegar contains acetic acid, which naturally cuts through the cloudy mineral deposits left by hard water and kills most household mold and bacteria. Baking soda is a base that actively neutralizes acidic odor molecules, making it perfect for rescuing a bottle that smells like yesterday's stale coffee. When dealing with an extremely dirty bottle, combining boiling water with a few tablespoons of baking soda creates a powerful, non-toxic soaking solution. This method is incredibly safe for your health and the environment, ensuring no harsh chemical detergents leach into your daily hydration.
| Natural Cleaner | Primary Function | How to Use |
| White Vinegar | Kills bacteria, removes scale | Mix 1:5 with warm water, soak overnight. |
| Baking Soda | Deodorizes, gentle scrubbing | Make a paste with water, scrub well. |
| Lemon / Citrus | Cuts grease, adds fresh scent | Rub directly on stains or soak with hot water. |
Does your metal bottle smell like old gym socks or sour milk? Lingering odors make drinking unbearable and indicate trapped bacteria. Eradicate stubborn smells from stainless steel permanently.
To remove odors from stainless steel bottles, fill the bottle with a mixture of boiling water and two tablespoons of baking soda. Let it sit overnight, then scrub thoroughly and rinse. For extreme odors, substitute the baking soda with a 50/50 mixture of white vinegar and hot water.
Because high-quality stainless steel is inherently non-porous, when it retains a foul odor, the smell isn't actually in the metal itself. Instead, it's trapped in a microscopic layer of biofilm, natural oils, or food residue coating the interior. Often, the culprit isn't the bottle body at all, but the silicone seals inside the lid, which are highly porous and notorious for absorbing flavors. To truly banish the stench, you must extract the silicone rings and soak them separately in a concentrated vinegar solution. Never use chlorine bleach on stainless steel. The corrosive chemicals in bleach will rapidly degrade the metal, causing micro-pitting and rust. This rough surface will only trap more bacteria in the future, worsening the odor problem permanently.
| Odor Type | Recommended Treatment | Action Required |
| Musty / Moldy | White Vinegar Soak | Kills fungal spores completely at the root. |
| Sour / Dairy | Baking Soda Soak | Neutralizes acidic protein residues safely. |
| Coffee / Tea | Denture Cleaning Tablet | Lifts tannin stains and lingering organic smells. |
Spotted black specks inside your favorite infuser bottle lid? Ingesting mold is a fast track to respiratory issues and illness. Stop fungal growth dead in its tracks with these prevention techniques.
Yes, mold can easily grow inside infuser bottles, particularly in the mesh filters, silicone gaskets, and lid threads where moisture gets trapped. To prevent mold, completely disassemble the bottle, wash it thoroughly, and let all parts air-dry completely in a well-ventilated area before reassembling.
Mold spores are ubiquitous in our environment, and all they need to thrive is a dark, damp place with a food source—such as the sugary remnants of an iced fruit infusion inside a closed travel mug. The single most critical step in mold prevention is proper drying. Many people wash their bottles and immediately screw the lid back on while the inside is still damp, effectively creating a perfect, humid greenhouse for mold. Always store your reusable bottles with the lids off, allowing air to circulate. If you do discover mold, particularly black mold around the rubber seals, soaking the affected parts in a solution of hydrogen peroxide or white vinegar is absolutely necessary to kill the spores before attempting to scrub them away.
| Componente | Mold Risk Level | Prevention Strategy |
| Silicone Gaskets | High | Remove, wash, and dry thoroughly weekly. |
| Infuser Mesh | Medium | Scrub with a stiff bristle brush after use. |
| Lid Threads | High | Use a detail brush, air dry completely. |
| Bottle Body | Low | Store upside down without the lid attached. |
Maintaining your reusable bottles and infusers requires daily dismantling and washing, followed by weekly deep cleaning. By using the right tools and natural pantry cleaners, you guarantee safe, fresh, and delicious hydration everywhere you go.